

Dough It Yourself! How to Build a Brick Pizza Oven at Home
Why Building Your Own Pizza Oven Is the Ultimate Weekend Project
How do I build a pizza oven at home? The answer is simpler than you think: choose your materials (brick, clay, or perlite-cement), build a solid foundation, shape the dome with proper ratios, add insulation, and cure it gradually. Here's what you need to know:
Quick Build Overview:
1. Foundation - Pour concrete slab or build block base
2. Floor - Lay firebricks in herringbone pattern
3. Dome - Use sand mold or exercise ball form
4. Materials - Apply clay/sand mix or perlite-cement (5:1 ratio)
5. Insulation - Wrap with ceramic fiber blanket
6. Curing - 7-day progressive firing schedule
7. Cost - $250-$4,000 depending on materials
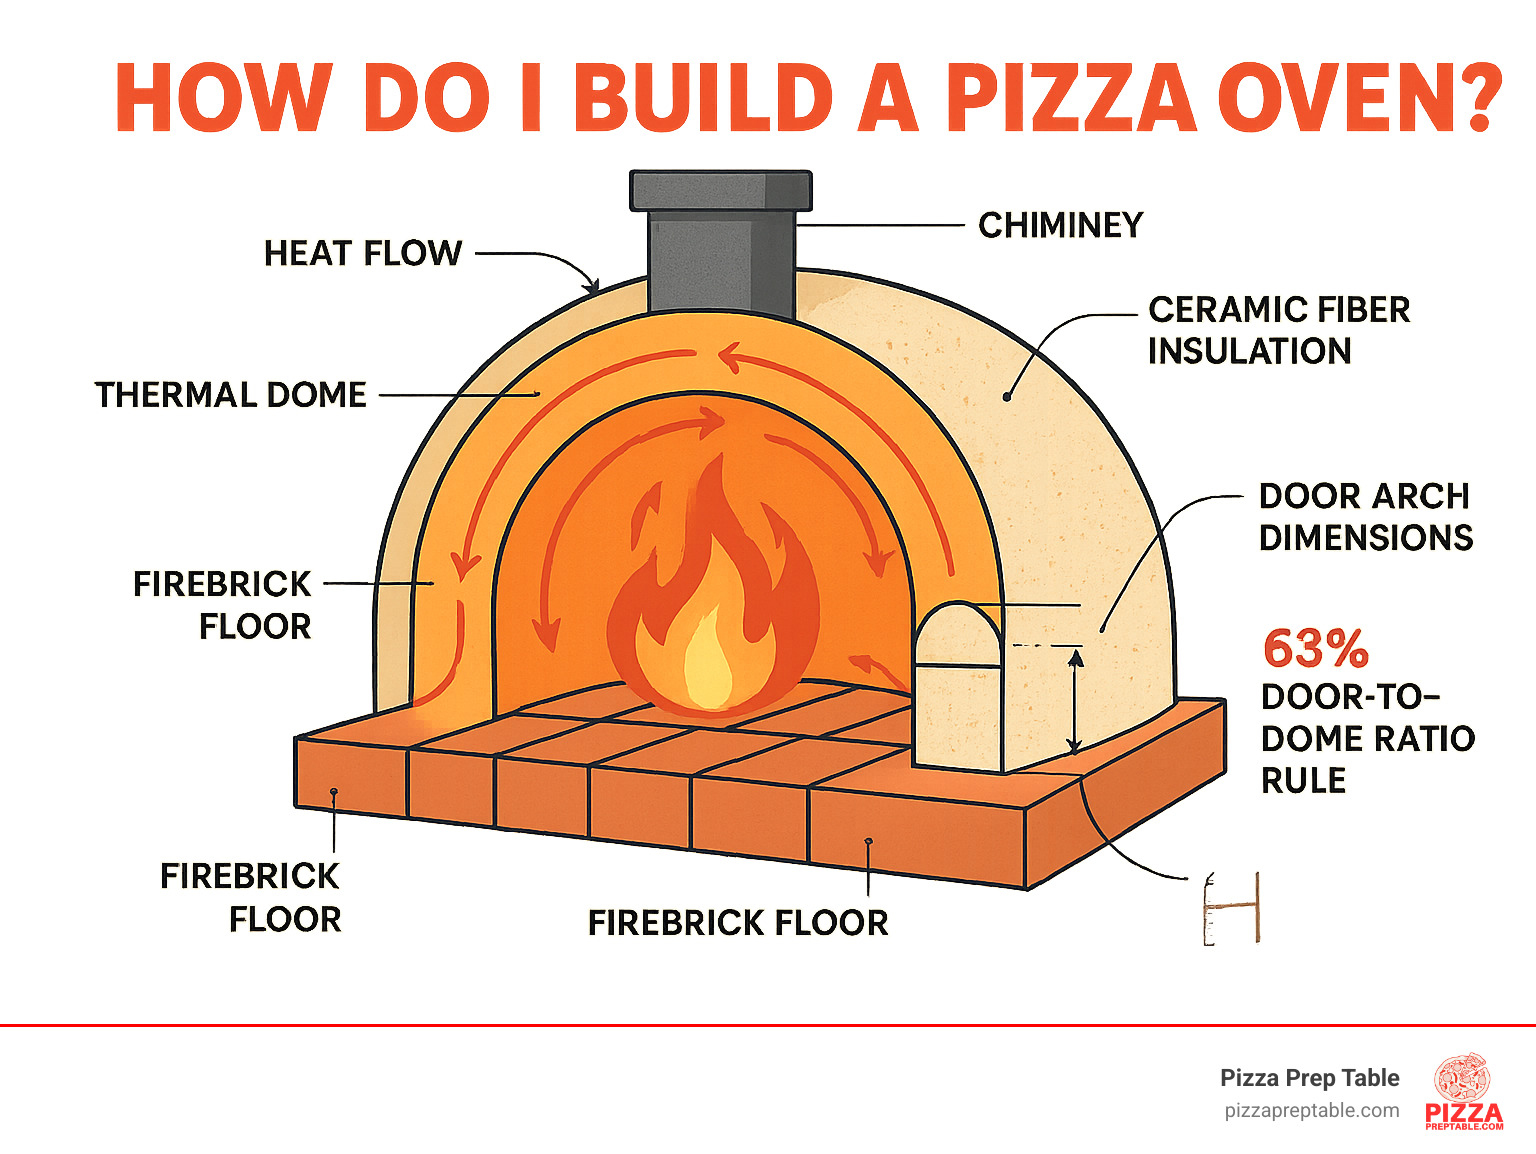
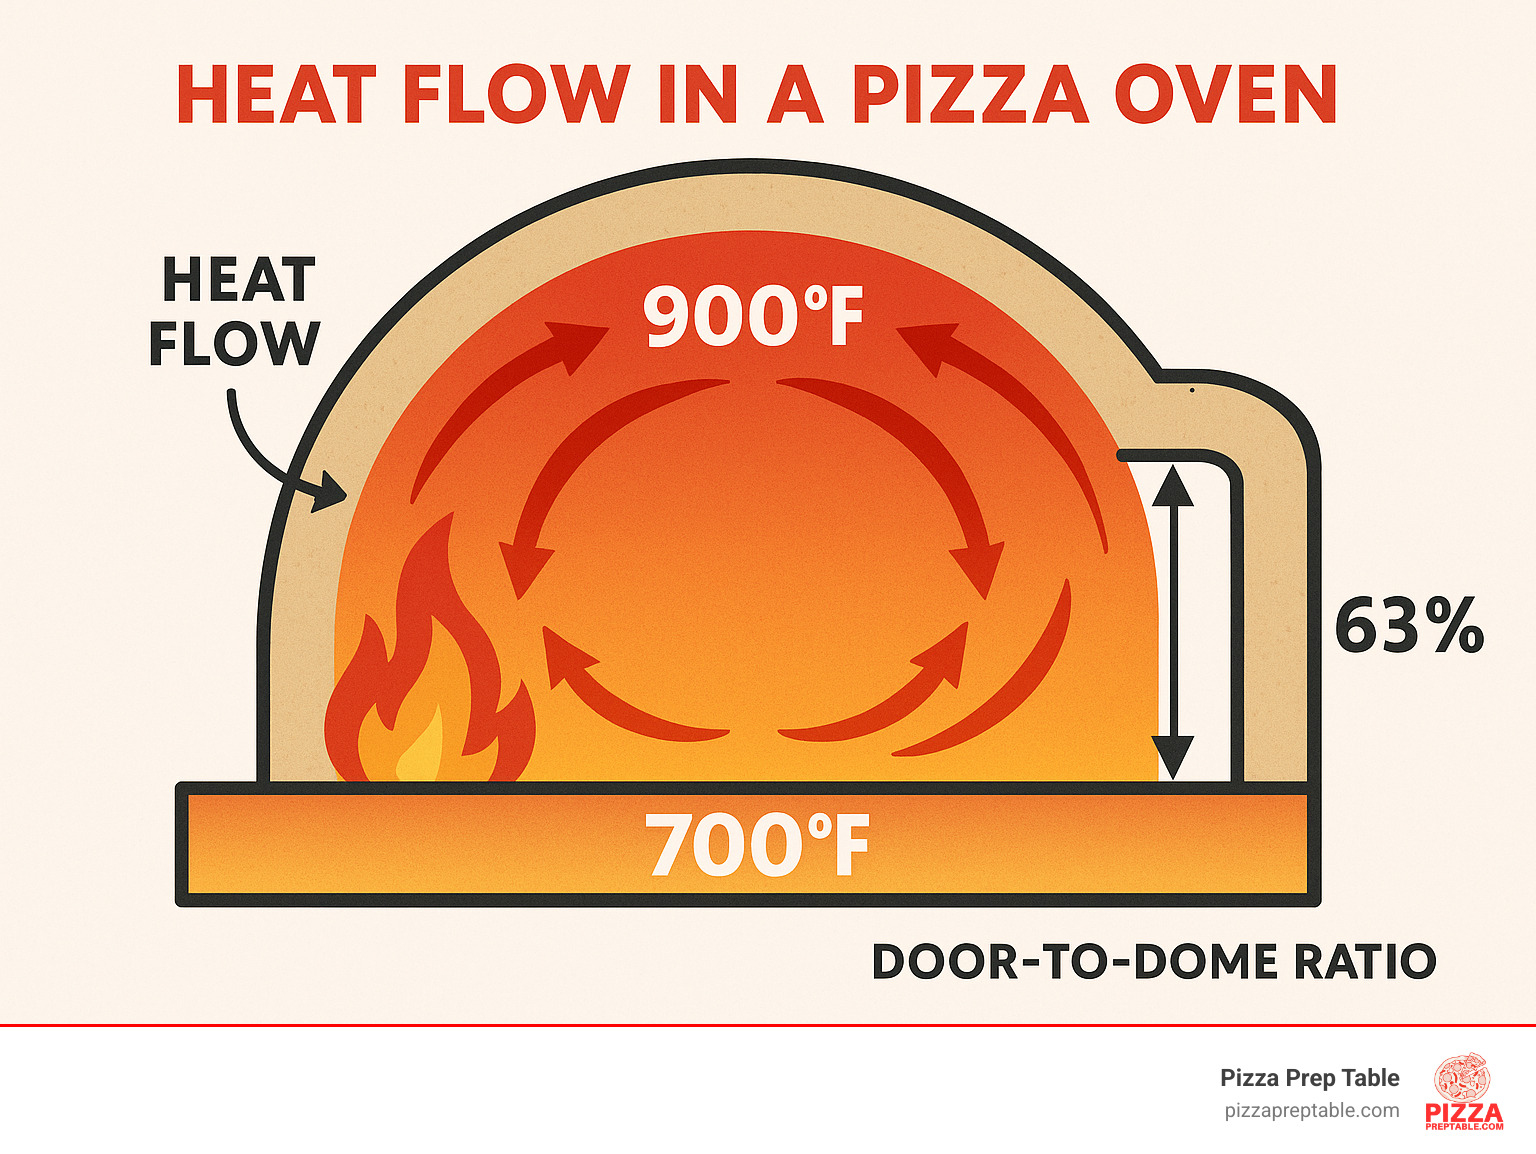
The magic happens when wood fire meets that 900°F dome. Building times range from a single weekend for simple designs to several weeks for elaborate masonry projects. The key is understanding the 63% door-to-dome height ratio and using proper refractory materials that won't crack or explode under extreme heat.
I'm Sean Kearney, and my background in restaurant equipment sales has shown me how crucial the right cooking tools are for food businesses - which is exactly why understanding how do I build a pizza oven properly can save thousands compared to commercial units.
How Do I Build a Pizza Oven? Core Design Principles
When you're wondering "how do I build a pizza oven", you're really asking about creating a heat engine that can reach 1000°F and cook like the ancient masters did. The dome shape reflects heat evenly across your cooking surface, creating those perfect leopard spots on pizza crusts.
The 63% rule is absolutely critical. If your dome's internal height is 16 inches, your door opening should be about 10 inches tall. This ratio ensures proper heat circulation without losing precious heat through the opening.
Your chimney placement matters more than most DIY guides mention. Position it at the front of the oven, just behind the door arch. This creates the right draft for clean combustion while letting you control where the smoke goes.
Skimping on insulation is a costly mistake. A properly insulated oven is like a thermal battery. You can cook pizza at 900°F, then bake bread hours later using just the stored heat. Without good insulation, you'll burn through firewood like crazy.
Scientific research on refractory materials reveals something scary: regular concrete can literally explode when heated above 450°F. The trapped moisture turns to steam faster than it can escape. Safety isn't optional here.
Firebrick versus clay brick makes a huge difference—firebrick stores more heat and releases it more evenly. Clay bricks might be cheaper, but they can crack under thermal stress.
Understanding Oven Types: Brick, Clay/Cob, Perlite-Cement, Modular Kits
Brick ovens are the gold standard for serious pizza makers. They use firebricks for incredible thermal mass, taking 2-4 hours to heat up but holding temperature for days. Budget $2,000-$6,000 for materials, and plan on 2-3 weeks of build time.
Clay and cob ovens offer the most affordable entry point at $200-$500. You'll mix clay, sand, and straw into a workable material that's been used for centuries. These ovens heat faster than brick but don't hold heat as long.
Perlite-cement domes are the sweet spot for most DIY builders. Mix perlite with Portland cement at a 5:1 ratio, and you get concrete that withstands 1600°F+. Total materials cost just $250-$400, and you can shape the dome in a weekend using an exercise ball as your form.
Modular kits take the guesswork out of the whole process. Kits start around $2,000, install in 1-3 days instead of weeks, and come with consistent thermal performance plus warranties.
How Do I Build a Pizza Oven Step by Step—Choosing Safe Materials
Lead-free firebricks are your foundation material, rated for 2500°F+ and costing about $1.75 each. Refractory mortar bonds these bricks with joints that won't crack under thermal stress. Ciment Fondu (calcium aluminate cement) resists heat far better than regular Portland cement.
For insulation, ceramic fiber blanket rated to 2300°F is five times more effective than perlite concrete. Perlite itself makes excellent lightweight aggregate for heat-resistant concrete at $17 per bag.
Now here's what to avoid: Regular concrete explodes above 450°F. Standard clay bricks can shatter from thermal shock. Flagstone or slate crack from uneven expansion.
| Safe Materials | Temperature Rating | Cost | Best Use |
|---|---|---|---|
| Firebricks | 2500°F+ | $1.75 each | Cooking floor, dome structure |
| Ciment Fondu | 1800°F+ | $49/bag | High-temp mortar mixing |
| Ceramic Fiber | 2300°F | $12/sq ft | Primary insulation layer |
| Perlite | 1600°F+ | $17/bag | Insulating concrete aggregate |
Planning & Layout Before You Lift a Brick
The excitement of how do I build a pizza oven can make you want to start mixing mortar right away, but slow down! The most successful DIY builders spend as much time planning as they do building.
Site selection is your first critical decision. You need a level spot that's at least 10 feet from any structures and gives you 3 feet of clearance from anything that could catch fire.
Check your local building codes before you dig. Some areas require permits for permanent outdoor ovens, especially if they're attached to structures or exceed certain sizes.
Foundation depth depends entirely on where you live. If you're in a northern climate, you'll need to dig below the frost line—typically 36 to 48 inches deep—to prevent your oven from heaving and cracking come spring. Southern builders often get away with 12 to 18 inches.
For sizing, a 4×4-foot base handles most home ovens perfectly. The magic number for internal diameter is 30 inches—this sweet spot lets you cook two 12-inch pizzas at once while maintaining proper heat distribution.
Create a full-scale floor template using cardboard or plywood. Lay it out exactly where your oven will sit. A herringbone pattern looks professional and prevents pizza peels from catching on brick edges.
Essential tools include a masonry trowel, 4-foot spirit level, rubber mallet, wheelbarrow for mixing, infrared thermometer, pizza peel and brush, plus safety gear like gloves, eye protection, and a dust mask.
Skill requirements are more forgiving than you might think. Many successful builders are complete beginners who simply followed proven designs with patience. If you can lay level courses of blocks and mix concrete, you can absolutely build a pizza oven.
Once your oven is operational, you'll want to think about efficient pizza production workflows. More info about prep stations becomes incredibly relevant when you're hosting pizza parties.
Drawing Your Blueprint and Costing the Build
Basic builds running $250 to $500 use perlite-cement domes with reclaimed materials. Mid-range builds at $500 to $1,500 get you quality firebricks, proper insulation, and new materials. Premium builds from $2,000 to $4,000 involve full masonry construction with custom features.
Timeline expectations vary dramatically. Weekend warriors can stack a temporary brick oven in 8 to 16 hours. Two-week builds using perlite-cement domes work well if you can only dedicate weekends. Month-long projects for traditional masonry ovens are for those who want heirloom-quality results.
Reclaimed materials can slash your costs dramatically. Check construction sites (with permission), demolished buildings, and online marketplaces. Old firebricks often perform better than new ones since they've already been through thermal cycling.
Permit considerations vary by location, but most areas don't require permits for temporary ovens. Permanent installations are different. Check with your building department about setback requirements, fire safety clearances, and chimney height regulations.

Step-by-Step Construction Timeline
Building a pizza oven follows a logical sequence that can't be rushed. Each phase must cure properly before proceeding.
Week 1: Foundation and Base - Day 1-2: Excavate and pour concrete slab - Day 3-7: Cure concrete (mist daily for strength)
Week 2: Hearth and Floor - Day 8: Build cinder block stand with wood storage - Day 9: Install insulation layer - Day 10: Lay firebrick floor in herringbone pattern
Week 3: Dome Construction - Day 15: Build sand dome form or inflate exercise ball - Day 16-17: Apply thermal layer (clay mix or perlite-cement) - Day 18-21: Air dry thermal layer
Week 4: Insulation and Finishing - Day 22: Remove dome form - Day 23: Install ceramic fiber insulation - Day 24-25: Apply protective render/stucco - Day 26-28: Build and install chimney
Week 5: Curing and First Fires - Day 29: Small candle fires to drive out moisture - Day 30-35: Progressive kindling fires and temperature testing
Building the Base and Hearth
Your foundation carries the entire oven's weight—typically 1,000-2,000 pounds when complete. Pour a reinforced concrete slab using 1:6 cement to ballast mix, minimum 6 inches thick. Use rebar grid for reinforcement and cure for at least 7 days.
The cinder block stand serves multiple purposes: elevating the oven to working height, providing wood storage, and creating an insulation chamber. Build walls using standard 8×8×16-inch blocks, filling cores with concrete for stability.
Wine bottle insulation is a clever trick from traditional builders. Lay empty bottles neck-to-tail in a clay-sawdust slip under your firebrick floor. The trapped air provides excellent insulation while recycling materials.
Shaping the Dome and Door (The 63% Rule)
The herringbone firebrick floor isn't just pretty—it prevents your pizza peel from catching edges and chipping bricks. Cut bricks with a masonry blade, fitting them tight with sand-filled joints.
For the dome form, you have several options:
Sand Dome Method: Build a wet sand pile to your desired dome shape, cover with damp newspaper, then apply your thermal layer. This traditional method gives you complete control over the shape.
Exercise Ball Method: Inflate a large exercise ball (75cm diameter works well), secure it in a plywood ring, then apply perlite-cement or clay mix directly. The mixture should have "tacky consistency like forming an oatmeal ball."
The door arch requires precise calculation. For a 16-inch dome height, your door should be 10 inches (63% ratio). This ensures proper heat circulation—too tall and you lose heat, too short and you get poor airflow.
Adding Insulation, Chimney & Weatherproofing
Insulation transforms your oven from a pretty pile of bricks into an efficient cooking machine. Ceramic fiber blanket is the gold standard—just 2 inches provides better insulation than 6+ inches of other materials.
Wrap the entire dome, leaving only the door and chimney openings exposed. Secure with chicken wire or steel mesh, then apply a protective render. A simple 1:3 cement-to-sand stucco works well.
The chimney installation requires careful sealing. Use high-temperature sealant around the flue penetration and ensure proper slope for water drainage. A stainless steel flue liner resists corrosion better than standard black pipe.
Firing, Cooking & Safety Essentials
Now comes the exciting part—lighting your first fire! But this isn't the time to rush. Your oven needs to dry out slowly, or you could end up with cracks that'll haunt you forever.
Progressive curing fires are absolutely essential for driving out construction moisture without shocking the thermal mass. Start small with tea lights or candles inside the dome for the first 24-48 hours. Then move to small twig fires for about an hour on days 3-4. Kindling fires come next—2-hour burns on days 5-6. Finally, on day 7, you can build your first real fire.
An infrared thermometer becomes your best friend during this process. The dome can hit over 1000°F while your floor stays around 700-800°F—perfect pizza territory.
Hardwood selection makes a huge difference in both flavor and performance. Skip the softwoods like pine or fir—they create nasty creosote buildup. Oak, hickory, and fruitwoods are your friends here. They burn hot, last long, and add subtle flavors to your food.
Safety isn't glamorous, but it's crucial when you're dealing with 1000°F temperatures. Steam explosions from trapped moisture have destroyed ovens and injured builders. Always wear heat-resistant gloves and keep proper tools within reach. A fire extinguisher should be nearby, and never leave fires unattended.
When in doubt, connect with experienced builders at forums like Build community support—they've seen every problem and can help troubleshoot issues before they become disasters.
First Bake Checklist: From Cold Oven to 900°F Safely
Your first real pizza bake is a milestone moment. Before you light anything, clear out any ashes from curing fires and check that your door and chimney are completely clear. Gather your dry, split hardwood and have all your pizza ingredients prepped and ready.
The firing sequence follows a specific pattern. Build your kindling pyramid right in the center of the oven floor. As it burns, you're developing a coal bed—those glowing embers that provide steady, intense heat.
Once you've got good coals, push them to one side of the oven. This creates your cooking zone on the cleared floor space. Sweep the floor clean with a damp brush—any ash or debris will stick to your pizza bottom.
Temperature checking is critical here. Your floor should read 700-800°F for proper pizza cooking. Too hot and you'll char the bottom before the top cooks; too cool and you'll get soggy, pale crusts.
Pizza launch and rotation is where the magic happens. Dust your peel generously with semolina or cornmeal—this acts like little ball bearings to help your pizza slide. The actual launch requires a quick, confident jerking motion.
Rotate your pizza every 45 seconds for even cooking. The side facing the coals cooks faster, so keep turning it. Total cook time runs anywhere from 90 seconds to 3 minutes.
After pizza service, let your fire burn down completely for bread baking. When the dome turns from black to white (around 450-500°F), you've hit the perfect bread-baking temperature.
Budget, Maintenance & Long-Term Care
Building your own pizza oven is surprisingly affordable when you understand what drives the costs. Material costs make up 60-80% of your total budget. A clever builder using reclaimed firebricks and mixing their own perlite-cement can complete a functional oven for $250-$400. Go the premium route with new firebricks, ceramic fiber insulation, and quality refractory mortar, and you're looking at $2,000-$4,000.
Tools add another $200-$500 unless you can borrow from friends or neighbors. Most tools (trowels, levels, wheelbarrows) have value beyond this project.
Shelter considerations often catch people off-guard. A basic tarp setup works temporarily, but a permanent roof adds $500-$2,000 depending on materials.
Your oven will last decades with proper care. Spring inspections should check for winter damage—look for loose mortar joints, cracks in the render, and water damage around the chimney. Summer maintenance during heavy use means monitoring for new cracks after particularly hot fires. Small hairline cracks are normal thermal expansion, but gaps wider than a credit card need attention.
Fall preparation includes cleaning out accumulated ash and debris. Winter covers are essential in freeze-thaw climates. Water trapped in cracks expands when frozen, turning minor issues into major repairs.
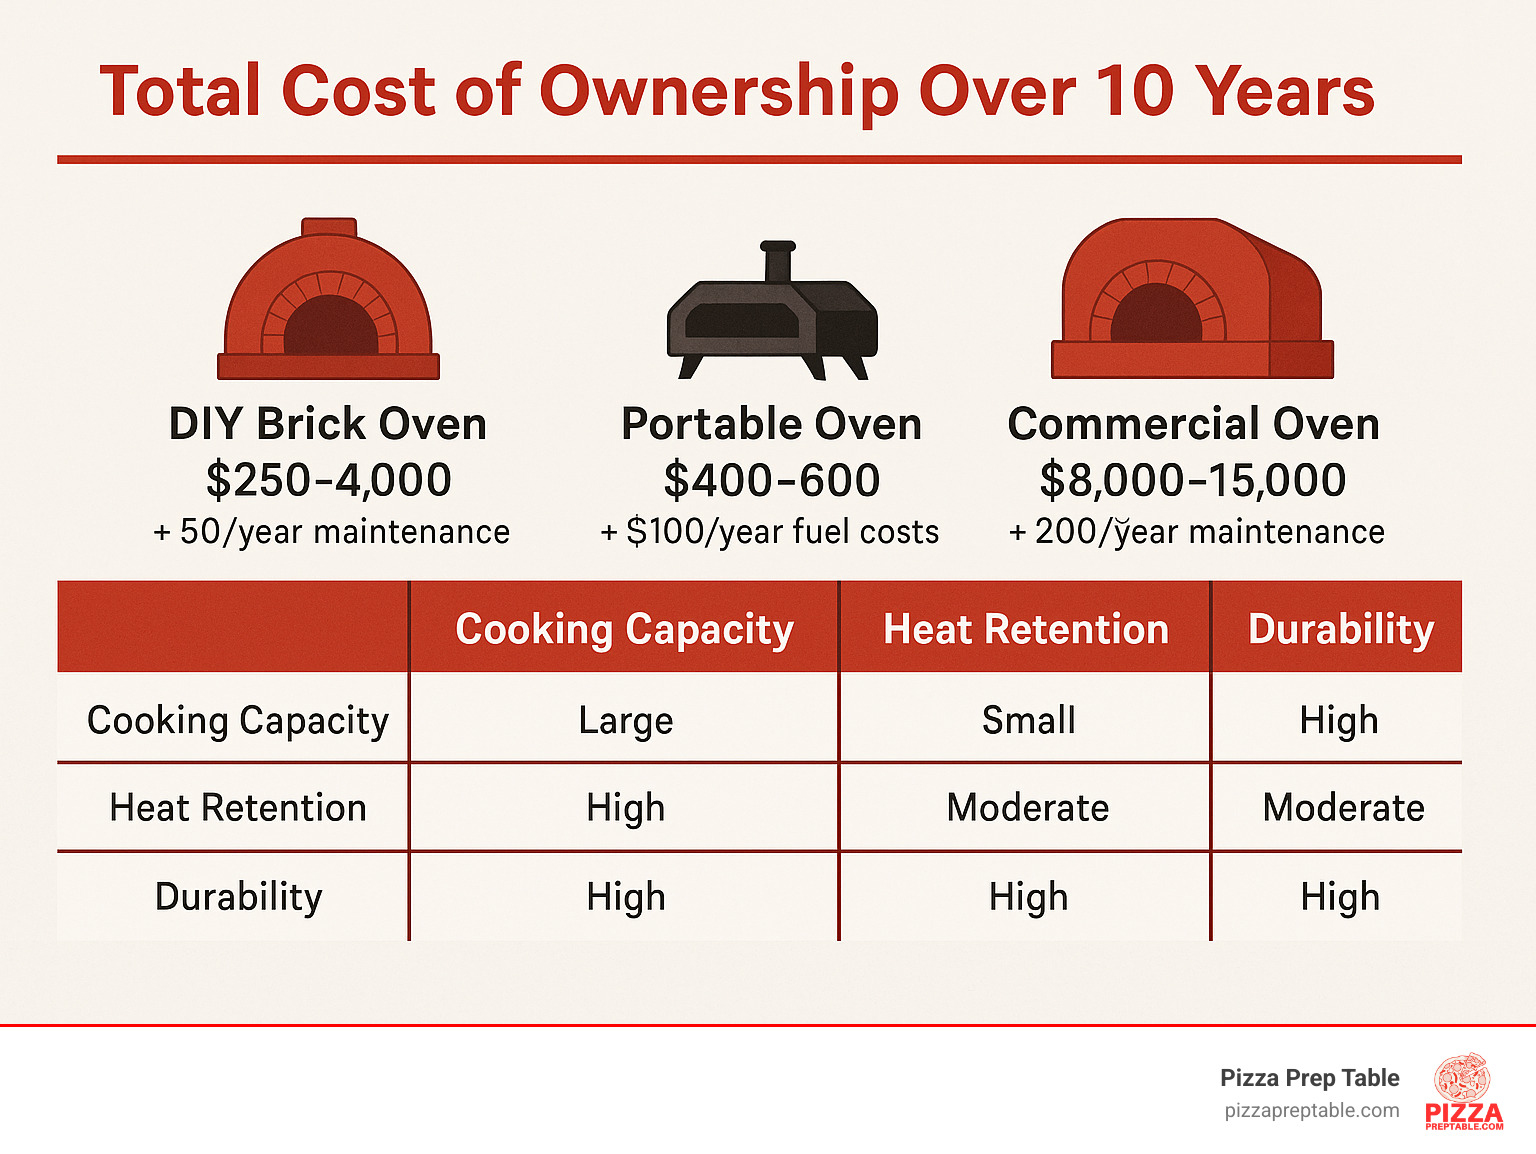
The DIY versus portable oven debate comes up constantly in pizza forums. A quality portable unit like the Ooni Koda costs $400-$600 and heats in 15 minutes—definitely convenient. But it requires constant fuel feeding and can't handle the volume or heat retention of a proper masonry oven.
As one experienced builder put it: "My DIY oven cooks 20 pizzas on Saturday night, then I bake bread Sunday morning using leftover heat. Try that with a portable unit." For occasional pizza nights, portables make sense. For serious cooking or entertaining, masonry ovens deliver better value long-term.
Restaurant owners face different calculations entirely. High-volume commercial operations need consistent performance and fast recovery times that favor purpose-built commercial units. Brick by Brick, Slice by Slice: Commercial Pizza Ovens Reviewed breaks down the economics for foodservice applications.
The real joy of building your own oven isn't just the money saved—it's the satisfaction of creating something with your hands that brings people together.
Frequently Asked Questions about Building a Pizza Oven
How long does it take to build and cure an oven?
The honest answer? It depends on what you're building and how much time you can dedicate to it. If you're wondering "how do I build a pizza oven" quickly, a temporary stackable brick design can go up in a single weekend—we're talking 8 to 16 hours of actual work time.
But permanent masonry ovens need 2 to 4 weeks from foundation to first pizza. That's not because the construction is complicated, but because proper curing can't be rushed.
The curing phase is absolutely critical and takes 7 to 14 days minimum. During this time, you're slowly driving out all the construction moisture through progressive firing. Skip this step or rush it, and you're asking for trouble—specifically steam explosions that can destroy months of work in seconds.
What mistakes cause cracking or explosions?
This is where things get serious. Steam explosions are real, documented, and completely preventable if you know what you're doing.
The biggest culprit is using regular concrete instead of refractory materials. When concrete heats above 450°F, trapped moisture turns to steam faster than it can escape. The result? An explosion that can send chunks of concrete flying like shrapnel.
We've seen this happen with wet clay or cement that wasn't properly dried, and with builders who used standard house bricks thinking they'd save money.
Structural cracking usually comes from three main issues: wobbly foundations that settle over time, cheap mortar that can't handle thermal stress, and the classic mistake of firing too hot too fast during those crucial first weeks.
The prevention strategy is straightforward but non-negotiable. Use only refractory materials, let everything dry completely, and follow the progressive curing schedule religiously.
Can I convert my oven to gas later?
Yes, you can convert to gas, but it's like putting an automatic transmission in a classic muscle car—technically possible, but you lose some of the soul in the process.
Gas conversion requires rethinking your airflow patterns since gas burners behave completely differently than wood fires. You'll need proper gas lines, safety controls, and ideally UL-tested components for larger installations.
But here's the thing: wood fires create that magical combination of radiant heat and smoky flavor that gas simply can't replicate. Many home builders who make the switch end up missing that authentic wood-fired experience.
For restaurants, dual-fuel capability makes business sense—you get consistency and speed when you need it. But for home builders, staying with wood usually means lower operating costs and that irreplaceable authentic taste.
Conclusion & Next Slice
Building your own pizza oven isn't just about answering "how do I build a pizza oven"—it's about creating a gathering place where friends and family will make memories for decades to come. Whether you went with a simple weekend perlite-cement build or spent months crafting an elaborate brick masterpiece, that first bite of pizza from your own oven makes every blister and backache worth it.
The beauty lies in the process itself. Take photos of your progress and share them with the incredible DIY community online. The Forno Bravo Forum has over 26,000 registered users who genuinely celebrate each other's successes and help troubleshoot problems.
Your oven will teach you patience in ways you never expected. The slow heat-up process forces you to slow down too. You'll learn to read the subtle color changes in the dome that signal perfect pizza temperature. You'll find that the best conversations happen while tending the fire, waiting for those coals to develop just right.
As your skills grow and you start thinking about expanding your pizza-making setup, efficiency matters just as much as flavor. Once your oven is operational and you're hosting regular pizza nights, having the right prep equipment makes all the difference. That's where we at PizzaPrepTable.com come in—we understand how proper commercial prep tables and equipment can transform your outdoor cooking experience, whether you're running a small pizzeria or just want to streamline your backyard pizza parties.
The investment pays off in ways you can't calculate. A properly built pizza oven can last 30-50 years with basic maintenance. Think about all the birthday parties, summer gatherings, and quiet weeknight dinners that will come out of your creation.
Don't overthink the perfect design. The best pizza oven is the one you'll actually use regularly. A simple dome that gets fired up every weekend beats an elaborate showpiece that sits cold because it's too complicated to operate.
Your homemade oven will spoil you for restaurant pizza. There's something magical about that wood-fired flavor and the crispy-yet-chewy crust that only comes from proper high-heat cooking.
Ready to dive deeper into artisan pizza making? More articles for pizza lovers are waiting to help you master everything from dough techniques to topping combinations that'll make your homemade oven sing.