
Build Your Backyard Pizza Paradise with a DIY Outdoor Pizza Prep Table
Why Building Your Own Outdoor Pizza Station is a Game-Changer
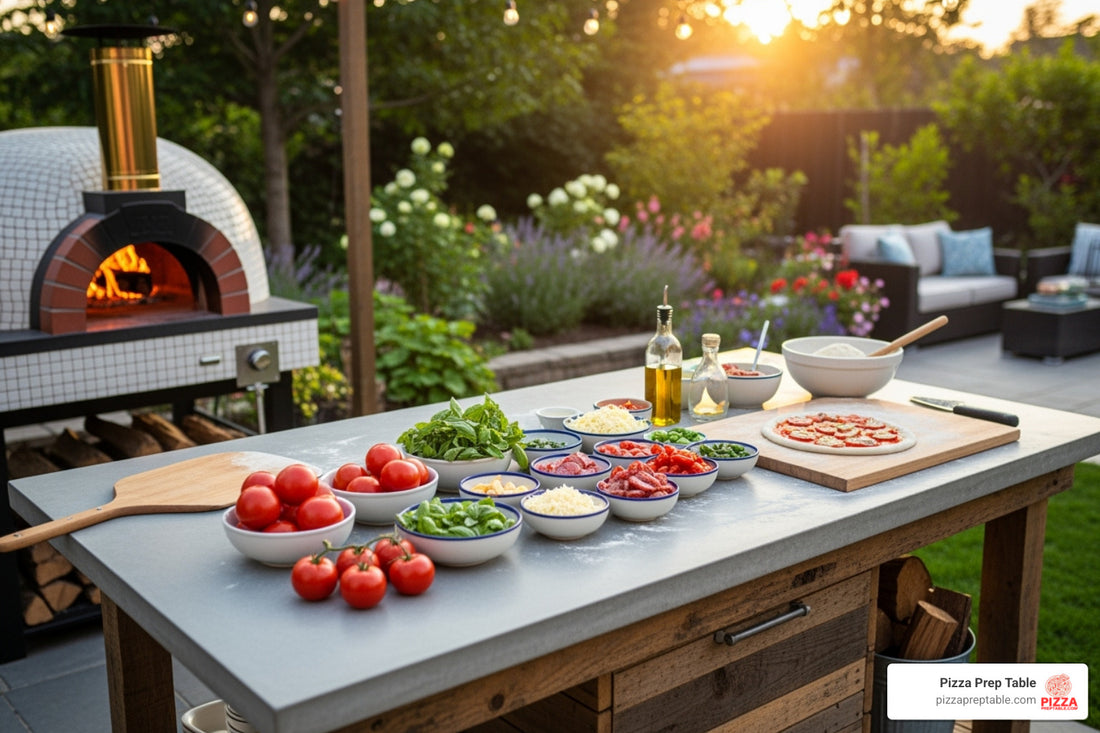
A diy outdoor pizza prep table transforms your backyard into a professional pizza-making paradise. Here's what you need to know:
Essential Build Components:
- Frame: Pressure-treated 2x4s or cedar lumber
- Countertop: Concrete pavers, granite remnant, or stainless steel
- Storage: Lower shelf for pizza oven and accessories
- Height: 36-39 inches for comfortable prep work
- Cost: Under $250 for basic build
Key Benefits:
- Custom size and height for your space
- Dedicated prep surface for dough stretching
- Storage for pizza tools and propane tanks
- Heat-resistant platform for pizza ovens
- Social cooking hub for family gatherings
As one DIY enthusiast shared after building their Martha's Vineyard-inspired setup: "For us, it is about more than just pizza. It's about everyone in the family chipping in and helping to make the dough... The whole 'pizza night' around an oven experience is one we knew we wanted our kids to grow up remembering."
Why go DIY instead of buying? You'll save hundreds of dollars, get exactly the features you want, and create a custom solution that fits your outdoor space perfectly. Most builds take just one weekend and require only basic woodworking skills.
I'm Sean Kearney, and my background in sales and deep appreciation for foodservice equipment has taught me the critical role that well-designed prep stations play in creating efficient, enjoyable cooking experiences. Whether you're building a diy outdoor pizza prep table for family fun or exploring commercial options for your restaurant, the right setup makes all the difference in your pizza-making success.
 Cost savings of 60-70% compared to commercial alternatives, 2) Custom design flexibility for height, storage, and features, 3) Streamlined pizza-making workflow with dedicated prep space and tool storage, 4) Social cooking hub that brings family and friends together around outdoor pizza nights - diy outdoor pizza prep table infographic 4_facts_emoji_light-gradient")
Learn more about diy outdoor pizza prep table:
Why Build a Custom Outdoor Pizza Station?
Picture this: It's Friday night, and you're ready to fire up the pizza oven for friends and family. But instead of scrambling between your kitchen and patio, juggling ingredients on a wobbly card table, you have a beautiful, sturdy diy outdoor pizza prep table that puts everything at your fingertips. This isn't just about convenience – it's about changing your entire outdoor cooking experience.
Building your own outdoor pizza station creates the perfect social hub for entertaining. There's something magical about gathering around a dedicated prep space where everyone can stretch dough, add their favorite toppings, and watch their creations come to life. It becomes the natural gathering spot where conversations flow as easily as the olive oil.
The workflow improvement alone makes this project worthwhile. No more racing back and forth to the kitchen for forgotten ingredients or trying to balance pizza peels on uneven surfaces. Everything has its place, from your portable pizza oven sitting securely on its heat-resistant platform to your tools hanging within easy reach.
And here's the best part – this makes an excellent family project. Kids love helping with the build, and they'll feel extra proud eating pizza from a table they helped create. As one family put it perfectly: "The whole 'pizza night' around an oven experience is one we knew we wanted our kids to grow up remembering."
For those curious about professional setups, check out more info about restaurant prep tables to see how the pros do it.
The Benefits of Going DIY
Let's talk numbers. Those gorgeous pre-built outdoor kitchen units? They can easily cost $1,500 or more. But a well-designed diy outdoor pizza prep table can be built for under $250. That's savings of 60-70% compared to commercial alternatives – money you can spend on better ingredients or that pizza oven you've been eyeing.
The cost-effectiveness goes beyond just the initial build. When you construct it yourself, you know exactly how it's built, making future repairs or modifications simple and affordable. Plus, you can source materials locally or even repurpose lumber you already have.
But the real magic happens with customization. Need a custom height because you're taller than average? No problem. Want extra-wide prep surfaces for big family gatherings? Easy. Prefer specific storage solutions for your particular pizza oven model? You're in complete control.
The personalized features are endless. Maybe you want a built-in ice bucket to keep drinks cold, or special hooks for your favorite pizza peels. Perhaps you need a secure compartment for your propane tank or extra shelving for plates and napkins. When you build it yourself, every detail reflects your specific needs and cooking style.
And let's not forget the incredible sense of accomplishment that comes from creating something with your own hands. Every time you fire up that oven on your custom-built table, you'll feel that special pride that only comes from DIY success.
Lift Your Pizza Nights
A dedicated prep station completely transforms how pizza night unfolds. Instead of chaos, you get a streamlined process where everything flows naturally from prep to plate.
Having everything in one place means your dough stays at the perfect temperature on the prep surface while toppings stay organized and accessible. Your pizza peel has a designated spot, flour stays within reach, and finished pizzas have a safe landing zone away from the heat.
This setup means less running indoors and more time actually enjoying your guests. No more abandoning conversations to dash inside for forgotten mozzarella or realizing you left the pizza cutter in the kitchen drawer.
The result? More time with guests and a relaxed atmosphere where everyone can participate. Pizza making becomes interactive entertainment rather than a stressful solo performance. It's perfect for backyard parties where the prep table becomes the natural gathering spot.
Most importantly, you're creating memories that last long after the last slice is eaten. There's something special about the ritual of pizza night when everyone has a role and a place around your custom-built station.
Planning Your Build: Design, Location, and Materials

A little planning goes a long way. Think of this stage as designing a mini-kitchen that lives outdoors. Focus on ergonomics (no sore backs), weather resistance, and durability so the table survives many pizza parties.
Choosing the Perfect Spot
Level ground is essential—stretching dough on a seesaw isn’t fun. If your yard is uneven, set a few concrete pavers or pour a small pad first. Place the table 10-15 ft from the back door so ingredients are still within easy reach, and watch prevailing winds so smoke drifts away from guests.
Shade matters too. Afternoon sun can turn granite into a griddle, so situate the station near a tree or plan for an umbrella. Finally, stay at least 3 ft from fences or overhanging branches. Portable pizza ovens can reach 800-950 °F; learn more about the physics of a wood-fired oven if you’re curious why the clearance is so important.
Essential Features for Your DIY Outdoor Pizza Prep Table
- Counter height: 36-39 in for most adults.
- Prep surface: minimum 24 × 36 in—bigger is better for family nights.
- Heat-proof oven platform: concrete pavers sized for your specific oven.
- Lower shelves: storage for fuel, peels, and trays.
- Side hooks: keep tools within arm’s reach.
Optional upgrades include a built-in ice bucket, paper-towel holder, or condiment rail. See more inspiration in our guide to topping stations.
The Best Materials for the Job
Frame
- Pressure-treated pine: budget-friendly, reliable—just reseal annually.
- Cedar: pricier but naturally rot-resistant and good-looking.
Countertop
- Concrete pavers: inexpensive, virtually indestructible.
- Granite remnants: premium feel for thrift-store prices—check local fabricators.
- Stainless steel: commercial-kitchen vibe, wipes clean in seconds.
- Large-format porcelain tile: smooth and heat-proof, though grout needs upkeep.
Use weather-rated screws, exterior wood glue, and finish everything with a quality outdoor stain/sealer for years of service. Mix and match materials to hit your sweet spot on budget, aesthetics, and longevity. For a deeper dive, see our tips on picking the perfect kitchen prepping table.
Your Step-by-Step Guide to a DIY Outdoor Pizza Prep Table

Here's where the real fun begins! Building your own diy outdoor pizza prep table is one of those satisfying weekend projects that combines practical woodworking with the promise of countless delicious pizza nights ahead. Don't worry if you're not a master carpenter – this build requires only basic skills and common tools.
The beauty of this project lies in its simplicity. We're essentially creating a sturdy workbench adapted for outdoor pizza making. Most successful builds follow a straightforward pattern: build a strong frame, add storage shelves, and top it with a heat-resistant surface. The whole process typically takes one weekend, and you'll have a custom station that rivals commercial options costing thousands.
Tools and Materials Checklist
Before we dive in, let's make sure we have everything we need. Having the right tools makes this project much more enjoyable and ensures professional-looking results.
Essential Tools:
- Miter Saw or Circular Saw for clean, accurate cuts
- Power Drill for driving screws and creating pilot holes
- Sander (orbital works great) for smooth finishes
- Tape Measure, Level, and Speed Square for precision
- Safety Glasses and Work Gloves (safety first!)
Materials You'll Need:
- 2x4 Lumber (pressure-treated or cedar) - about 16 pieces for a standard 54"x22" table
- Plywood or 1x4 Slats for shelving
- Exterior-grade Screws (2½" for framing, 1¼" for shelves)
- Exterior Wood Glue for stronger joints
- Sandpaper in various grits
- Outdoor Stain/Sealer to protect against weather
- Countertop Material (concrete pavers, granite remnant, or stainless steel)
- Masonry Adhesive if using stone or pavers
- Optional Heavy-duty Casters for mobility
- Optional Hooks for tool storage
Step 1: Cut Your Lumber and Build the Frame
The foundation of our diy outdoor pizza prep table starts with a rock-solid frame. Many builders adapt existing workbench plans, tweaking dimensions to accommodate their specific pizza oven and prep needs.
Start by cutting your four legs to your desired counter height. For most people, 36 inches feels comfortable, so we'll cut our 2x4s to about 35 inches (accounting for the thickness of our countertop material). It's always better to cut slightly long and trim later than to cut too short!
Next, we'll build two identical side frames. Each frame consists of two legs connected by horizontal stretchers at the top and bottom. This is where exterior wood glue and 2½" screws become your best friends. Apply glue to your joints before screwing them together – this creates incredibly strong connections that will last for years outdoors.
Once your side frames are complete and perfectly square (use that speed square!), connect them with longer 2x4s to form the full rectangular frame. These front and back stretchers determine your table's length, so measure twice and cut once. The result should be a sturdy, square frame that doesn't wobble when you give it a gentle shake.
Step 2: Add Shelving and Countertop Supports
Now we're adding the practical elements that transform a simple frame into a functional prep station. The lower shelf is crucial – it's where your portable pizza oven will live when not in use, along with fuel, tools, and accessories.
Install cleats (small support strips) inside your frame at your desired shelf height. These 1x4 or 2x2 pieces attach horizontally to the inside of your legs and support your shelf material. Most builders place this shelf about 8-12 inches from the ground, leaving plenty of clearance for larger items.
For the shelf itself, you have options. 1x4 slats create a classic look and allow excellent drainage – essential for outdoor furniture. Space them evenly with small gaps between each slat. Plywood offers a solid surface but requires drainage holes drilled at intervals. Either way, secure everything with 1¼" exterior screws.
Don't forget the center support beam across the top of your frame. If you're planning a heavy countertop like concrete pavers or granite, this extra support prevents sagging and provides additional stability when your pizza oven is running at full heat.
Step 3: Install the Countertop and Add Finishing Touches
The final steps bring your diy outdoor pizza prep table to life. Start with thorough sanding of the entire wooden structure. This isn't just about looks – smooth surfaces resist moisture better and feel much nicer to work around.
Apply at least two coats of quality exterior stain or sealer. A combination poly-stain product saves time and provides excellent protection against UV rays, moisture, and general wear. Take your time with this step – good finishing work is what separates amateur builds from professional-looking results.
Installing your countertop requires patience and precision. Concrete pavers are forgiving and heat-resistant, making them perfect for this application. Use masonry adhesive to secure them to your frame and to each other. Granite remnants offer a premium feel and easy cleanup – many stone suppliers sell sink cutouts for $25-$100. Stainless steel provides the ultimate in hygiene and heat resistance.
For added convenience, consider heavy-duty lockable casters if you want mobility. Make sure they're rated for outdoor use and can handle the combined weight of your table and oven. Finally, add hooks to the sides for pizza peels, brushes, and other tools. These small touches make a huge difference in day-to-day use.
Step back and admire your work – you've just built a custom outdoor pizza prep station that will serve you well for years to come!
Frequently Asked Questions about Outdoor Pizza Stations

How much does it cost to build a DIY outdoor pizza prep table?
Most builders come in under $250. Lumber and fasteners are inexpensive, and the countertop is the main variable. Concrete pavers cost just a few dollars each. Granite sink cut-outs from local stone shops usually run $25-$100, giving you a luxury surface for less.
Can I make my pizza prep table portable?
Yes—just bolt on four heavy-duty, lockable casters rated for outdoor use. Make sure their combined weight rating exceeds the table, oven, and accessories. Adding a small diagonal brace or thicker bottom stretcher helps the frame handle the extra stress of rolling.
What is the best surface for preparing pizza dough outdoors?
Granite is king: non-porous, heat-proof, and easy to clean. Stainless steel runs a close second and lends a pro-kitchen look. Large porcelain tiles work if you keep the grout sealed. If you prefer wood, top it with a removable silicone mat or cutting board for dough work to keep things sanitary and smooth.
Conclusion
Building your own diy outdoor pizza prep table is more than just a weekend project – it's the foundation for countless memorable evenings filled with laughter, delicious food, and quality time with the people who matter most. There's something truly special about gathering around a table you built with your own hands, watching dough transform into perfect pizzas while friends and family share stories and create memories.
We've walked through every step of this journey together, from choosing the perfect spot in your backyard to adding those final finishing touches. The cost savings of building under $250, the customization that fits your exact needs, and the satisfaction of creating something uniquely yours – these benefits extend far beyond the table itself.
Your new outdoor pizza station will become the heart of your backyard entertaining. No more juggling ingredients on unstable surfaces or running back and forth to the kitchen. Everything you need will be right at your fingertips, allowing you to focus on what really matters: enjoying the pizza-making process and spending time with your guests.
The streamlined workflow we've designed means less stress and more fun. Whether you're stretching dough for a quiet family dinner or hosting a full-blown pizza party, your custom prep table will handle it all with ease. And as the seasons change, your weather-resistant build will be ready for action whenever that pizza craving strikes.
For home pizza makers who want to upgrade to a professional-grade solution without the DIY effort, PizzaPrepTable.com offers a range of durable, feature-rich commercial food prep equipment. Our commercial pizza prep tables, restaurant equipment, and kitchen appliances are designed for peak performance, offering a wide selection and flexible financing options for both small independent shops and larger establishments.
Ready to find the perfect station for your needs? Explore our complete collection of pizza prep tables.
Now fire up that oven, gather your favorite people, and get ready to create some amazing pizza memories around your brand-new diy outdoor pizza prep table!